Showing posts with label Ada. Show all posts

Tuesday, March 11, 2014

What Landscape Edging Should You Choose

There are so many options to choose from when considering a form of edging for your garden beds: plastic, steel, aluminum, brick, stone, poured and formed concrete curbing, and natural spade edge.  I will explain the "spade edge" later.  The others are fairly self explanatory.  In this blog, I will lay out the pros and cons of each and the effort needed to install each.

Plastic Edging: 
For years, I have been telling my clients to stay away from plastic edging.   You know the kind: Three or  four inches tall, flimsy, with a tubular top designed to remain above ground and help delineate the space between garden and lawn.  I can't tell you how many times I have pulled plastic edging up at a project.  Usually, it is already broken and pushed several inches above its original installed position. 

The stuff is badly designed.  The six to eight inch spikes are too short and too few to hold the plastic in place, even when the soil has been packed around it as per manufacturer's specs. The spikes are generally spiked through the plastic, thus creating a break that will eventually assist in the failure of the edging.  Many of the manufacturers use flimsy plastic spikes that break easily.  The freeze-thaw cycles experienced in much of the country degrades the plastic, causing it to become brittle rather than flexible.  The same freeze-thaw cycle makes use of that tubular top to shove the plastic out of the ground within a few seasons.  Plastic edging is impossible to mow over or weed whip without breaking it.  Considering the amount of work required to install this edging (you have to dig a trench 3-4" deep and wide enough to slide the edging in and still have room to nail the spike in using a hammer), and the relatively short life-cycle of plastic edging, I say stay away from it altogether. 

Steel Edging:
Because steel is very strong, it would seem a good option for edging.  It should stand up to the abuse of mowers and weed wackers, shovels and rakes and weather.  However, steel edging is generally powder coated (painted) in order to protect the steel from rusting and breaking down over years of in ground application.  The green, black, or brown paint tends to chip off when run over by a mower, thus creating an opening for rust to take hold.  So much for rust protection.

Steel edging is heavy weight and tends to be less affected by frost heave than plastic edging and will, therefore, stay in place.  However, it is also more difficult to work with.  It does not flex well on tight turns, and requires more effort to trim in order to fit the beds you lay out.  In addition, obviously, steel edging is heavy.  It usually comes in 6-8' sections which must be connected using a built in locking mechanism.  This can be a challenge.  So, though steel will outlast plastic edging, I do not recommend using it for most applications.  Possible use: separating areas that will not be disturbed by mowing, weed whacking or digging.

Aluminum Edging:

Aluminum edging varies in quality greatly.  Low quality aluminum edging such as that found in big box stores is also flimsy.  When purchasing aluminum edging, choose heavier grade material, either 1/8 or 3/16" thick.  In Michigan, I purchase all of my aluminum edging from Curv Rite which is based in Wayland, MI.  They offer a wide variety of aluminum restrain systems.  I most often use either their 2000 series (1/8") or 3000 series (3/16") for garden or lawn edging projects.  These products come in 4" and 5.5" heights and 8' and 16' lengths.  Check their products out http://www.curv-rite.com/landscapeedgnig.html

Aluminum edging has com a long way in the past 15 years.  The quality and durability of professional grade edging is excellent.  The biggest problem I still see today, is with improper installation practices.  The edging is meant to separate lawns, and beds.  It is not meant to be decorative edging.  Bury the aluminum edging so no more than 1/2" sticks above the ground.  Grass and stone or mulch can hide the rest.  Leave it too high, and it will be damaged by mowers. 

This product still requires you to dig a trench deep enough and wide enough to set the edging in and nail the stakes in place.  Before you begin trenching, make sure you know where your utilities and irrigation and landscape lighting lines are.  It is easy to damage them when you are digging four or five inches deep.  Be very warry of using a trenching machine.  Better to do it by hand if you are not sure where all those lines run.  Then at least you will know if and when and where damage has occurred and can fix it before it becomes a larger and more costly issue.  

Unlike plastic, it takes a lot to damage the aluminum edging.  It won't break down like plastic or steel.  And it is easier to install than steel because it is light weight.  Overall, I believe aluminum edging is the most cost effective, long-lasting option available. And, you can do it yourself if you have the strength, skill and patience to dig your trench.

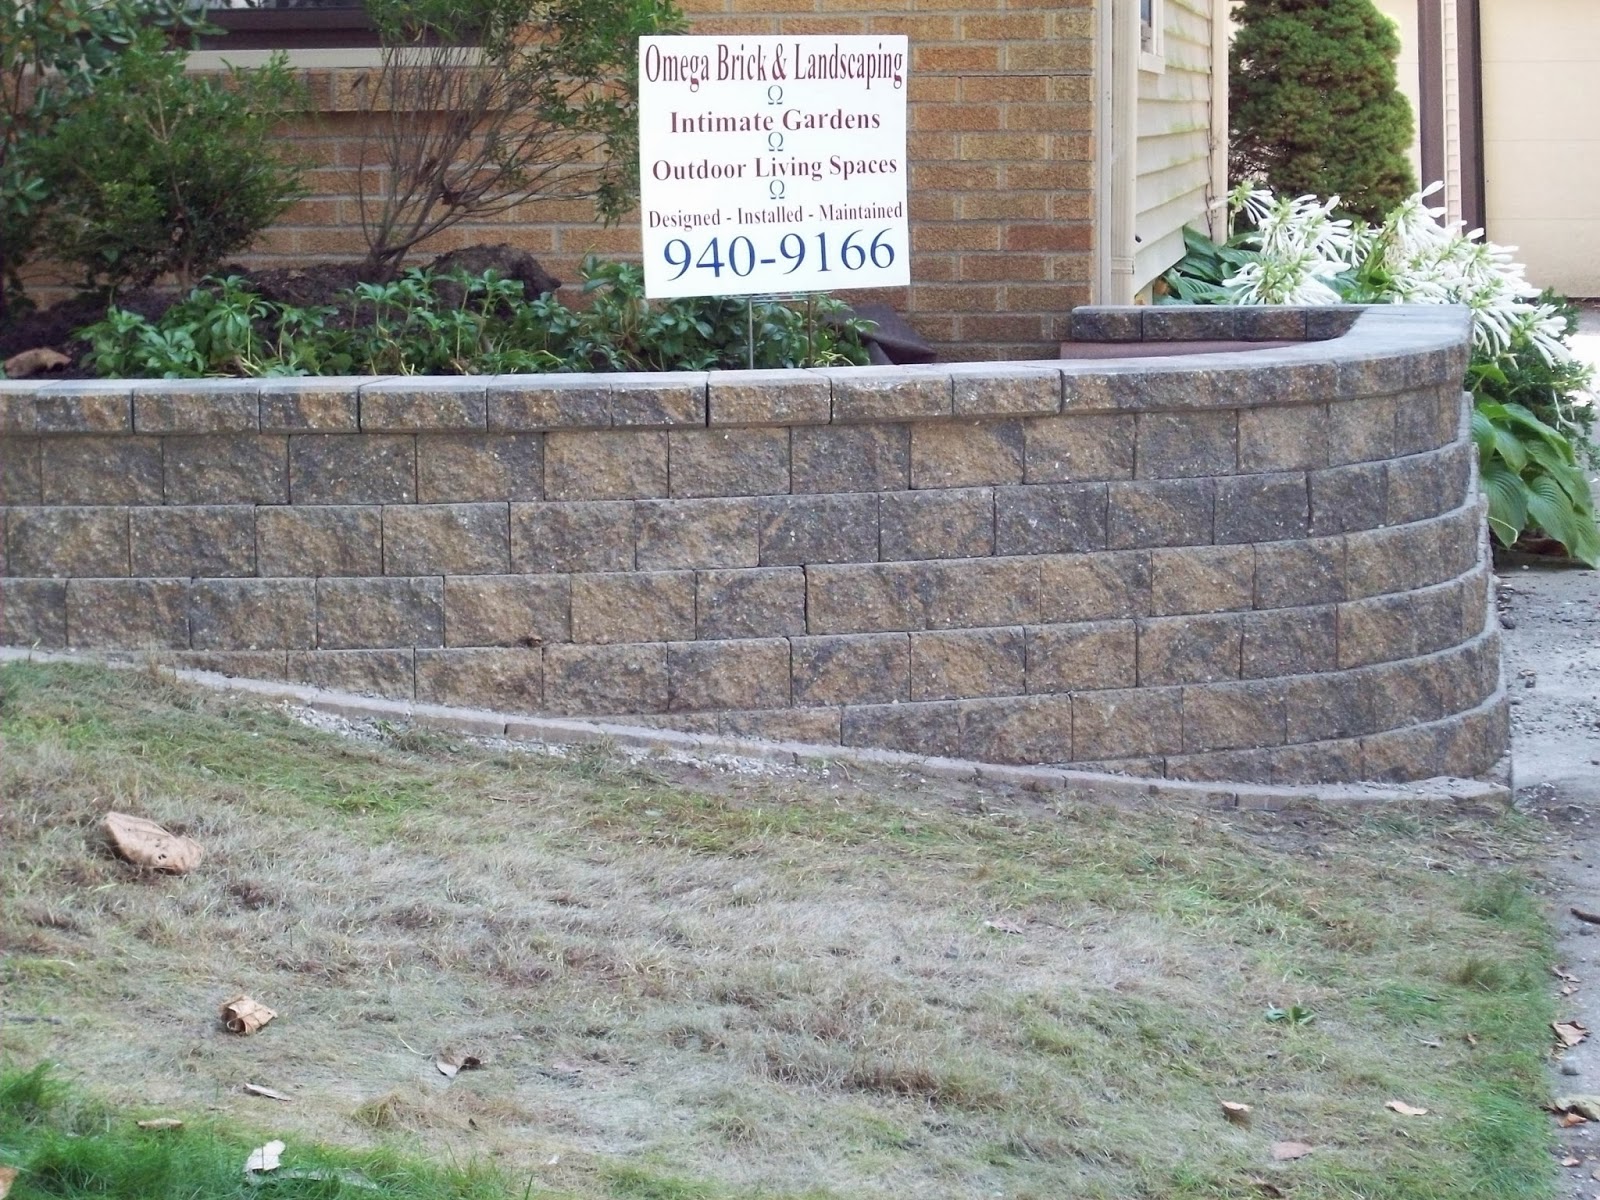
Brick and natural stone edging or borders can add character, depth and sense of permanence not encounter when using plastic, steel or aluminum edging.  Because of the innate color and texture variance of brick and stone, they provide another dimension of character to the landscape.  Chosen carefully, these edging options can also help tie structures to the landscape through those colors and textures found in the siding and roof of your home.  This continuity adds depth to both the house and garden. 

The literal weight of the brick or stone edging/border can be felt.  Our understanding and sense of awe at the structure of brick and stone buildings, castles, carvings, monuments etc. carries over into the garden.  It makes us feel like the garden has been around for a long time and will continue long into the future.  And properly installed, it can.

Proper installation of brick and natural stone edging varies based on the size of the individual pieces being laid.  Typical bricks weigh only a few pounds and therefore require some type of base to ensure they remain in place through the tough freeze and thaw cycles of Michigan.  The same goes for relatively small and thin natural stone (i.e. flagstone).  This will keep the bricks or stones from becoming uneven as the years go by.

When I lay brick and flagstone borders, I dig approximately 6 inches below the finished level and 2 inches wider than the width of the border.  So, if your brick is 4 inches long and 2 inches wide, and you are laying your bricks side by side with the long sides against each other (this is called a soldier run), your border will be 4 inches wide.  You will dig your trench a total of 6 inches wide to allow for 1 inch at either end of the 4 inch long brick.  Dig the full length of the trench before moving on the next step. 

Next, you will put 4 inches of crushed concrete or chips n dust at the bottom of the trench.  Chips n Dust is easier to work with that crushed concrete because it can be leveled more evenly.  Another option is stone dust.  Sand shifts too much.  You won't be able to compact it sufficiently, which leads to shifting of the stone or brick when any weight is applied, (i.e. running a lawn mower or wheelbarrow over the border).  Using a 4-6 inch wide tamper, thoroughly compact the crushed concrete, chips n dust or stone dust.  Use your brick or stone to check the depth of the trench to make sure there is enough base for the finished border to be approximately 1/4" above the grade of your lawn or garden bed.  Add or remove base material as needed.

Now start laying the brick or stone side by side, eliminating any gaps between by trimming with either a chisel and hammer or a diamond bladed saw.  Lay a several pieces and then check for smooth surface by laying a straight edge or level across the top surface.  Using a rubber mallet, tap any areas that are too high.  Add chips n dust or stone dust as needed to raise low bricks or stones.  Once an area of several linear feet has been laid, tamp soil at along the ends of the bricks to help hold them in place.  Using brick edging along the garden bed side of the border may be helpful because you probably add mulch to the beds on regular basis and will want to push back soil and mulch each year to make sure it does not overflow the border.  The brick edge ensures the bricks stay put in the process.

Call or Text Brent NOW
(616) 328-3258
To learn more and retain my Professional Landscape Design & Installation Services

Brent Langley in East Grand Rapids, MI on Houzz


Tuesday, February 25, 2014

How to Build a Retaining Wall in Michigan

Retaining walls can be built of numerous materials types, natural stone such as fieldstone and quarried stone, man-made pre-cast or cast in place concrete wall systems, brick, timber, composite materials (plastic and wood particles combined), and even metal.  My preference is to build retaining walls in natural stone, but generally, the cost of natural stone is significantly more than that of man-made materials due to mining/quarrying costs and installation labor costs.  Michigan fieldstone boulders are an exception to this rule since they require less foundation preparation, and are more common in West Michigan than is quarried stone, and thus costs less in labor and materials.
 

This retaining wall was built by Omega in 2013 using seven tons of Michigan fieldstone boulders hand picked from Grand Rapids Gravel, and planted using material from Bohemia Nursery in West Olive, MI.

The wall and steps seen here were built by Omega Brick & Landscaping using Burnt Red Blend Wallstone/Wedgestone and Stratford Pavers manufactured by Hanson.
Built by Omega Brick & Landscaping using Antique Wallstone and Wedgestone Wall in Grand Rapids Township near Frederick Meijer Gardens


 I built this wall several years ago on Philadelphia SE in Grand Rapids, MI using St. Clair PISA 2 retaining wall by Unilock.
 
Split Chilton Wallstone, a natural limestone mined in Wisconsin, was used by Omega to build this wall in Ada, MI
 
Regardless of the materials being used, all retaining walls share fundamental building requirements that ensure long-lasting structural integrity.

1. Properly placed and compacted foundation material to keep your retaining wall from sinking or tipping. 
 
2. Geo textile fabric to separate base and backfill material from native soil which, left to its own device, will seep into the base and backfill material and degrade them as well as seep through the front of the wall. 

3. Properly placed and compacted backfill material to keep water from undermining the your wall or, in the case of wood, rotting it.
 
4. Carefully placed and leveled retaining wall foundation.
 
5. Properly sloped soil above the retaining wall to direct water away from the wall or over the wall.
 
When preparing your site for a retaining wall, whether replacing an existing wall or building a new one, consider all surrounding structures and land formations. These structures and formations can have a significant effect on the survival of your retaining wall by directing water toward or away from your wall.

If water will be directed toward your wall as things stand, you will need to redirect the water by installing drains and drain tiles or by changing the slope of the land formations. Which you choose has much to do with the amount of labor and equipment cost. Drains and drain tiles are inexpensive in and of themselves. However, installing them can require significant time and equipment costs. The quickest way to install a drain tile is with a trencher such as the Ditch Witch. In Grand Rapids, MI, I rent this machine from Advanced Rentals. http://www.advancedrentalcenter.com/products_43_Trencher-30-x-4.html?cat=2&sub=11 .

Dig your trench a minimum of eight inches wider than your retaining wall material.  Dig deep enough to lay down a minimum of six inches of crushed concrete or gravel (your base material) plus the height of one block, timber or stone.  Your will bury the first layer of your wall below grade.  In this case, because the soil here is clay and tends to hold water, in order to ensure minimal shifting and upheaval in I dug twelve inches below grade. 

 By digging 12 inches below grade, I was able to install eight inches of crushed concrete and still have room to bury my first course of retaining wall block.  Better safe than sorry.


Retaining walls built in Caledonia, MI for use as raised planting beds.
These are part of the system seen in the pictures above demonstrating proper base preparation.
 

Once your trench has been dug, lay out your geo textile.  Run the fabric from the front of the trench, down into the trench and up the back side of the trench and hill you are retaining.  Use large staples to hold the fabric in place both front and back of the trench.  Once the retaining wall is completed, you will need to pull the fabric over the front and back of the trench to cover the base and backfill material, so be sure to leave at least one foot of fabric beyond the front of the trench and two feet above the hill.  Also, allow enough slack in the fabric for the crushed concrete and stone to settle without tearing it.
 

Crushed stone from Grand Rapids Gravel.  Not the angular nature of the stone.  This allows the stone to be compacted and keeps it from shifting as happens with rounded pea stone/gravel or washed stone.

To make it easier to level your first layer of stone or block, consider laying a layer of chips n dust or stone dust on top of the crushed concrete approximately 1/2"-1" deep.

In Grand Rapids, MI, I purchase all of my crushed concrete and crushed stone from Grand Rapids Gravel.

Once the crushed concrete is fairly level, it is time to begin laying the blocks or stone.  You must place each block/stone individually, leveling each from front to back and side to side.  Level your first unit using a six or twelve inch level, tapping it with a heavy rubber mallet to lower set it deeper into the crushed concrete where it is too high.  If you need to add material under the block to get it right, use chips n dust, or stone dust.  It easier to level blocks and stone on chips n dust or stone dust than it is on crushed concrete.  Lay the second unit next to the first, using the first to level the second. 

Crushed stone is the preferred material for use behind retaining walls. Check them out at http://www.grgravel.com/ Try to install a minimum of twelve inches of crushed stone behind your wall. It is best to place the stone as you go to ensure proper compaction on filling. I install the stone after each level of retaining wall. I usually use a hand held tamper rather than a plate compactor. A plate compactor tends to push the the retaining wall our of alignment, requiring you to go back and push blocks back into place. If you are using fairly heavy retaining wall units (over 80lbs each), you will be safe using the compactor and save yourself a lot of manual labor. Be sure while you are putting in the backfill material to keep the geo textile fabric from pulling away from the native soil. You don't want to create gaps in the fabric where the soil can sift through and undermine the backfill and wall.

You may be required to cut the stone/block as you build in order to get a tight fit between blocks.  The best option is to rent a concrete saw or a large brick/block saw from a local rental company such as Home Depot or Advanced Rental here in Grand Rapids, MI.  These saws are equipped with diamond blades that make quick work of these cuts. 

Do not use blocks smaller than half the length of the standard units if at all possible.  They can become unstable and can be pushed out of the wall.  If you must use smaller pieces, use masons adhesive/glue to hold them in place by gluing them to the blocks above and below them.  Otherwise, the only time you should use adhesive is when you get to the capstones.  The capstones should be glued down using two beads of adhesive running lengthwise along the top of the previously laid layer of block: one bead two inches from the back of the block, one along two inches from the front of the block.  Try not to place the glue too close to the front.  If you do, the glue will ooze out and be exposed on the front of the wall.  The glue is difficult to remove.

When setting the capstone, use a rubber mallet to tap each block down to achieve proper adhesion.

 
For assistance with design or installation of your retaining wall,
 
Call Brent Langley today @ (616) 328-3258.


Saturday, October 15, 2011

Polymeric Sand: Controlling Weeds Between Pavers

Over the last fifteen years or so, I have installed numerous brick and stone patios, walkways and driveways. Here in Michigan, most paving is dry-laid, that is, there is no concrete or mortar involved in the installation process. Because concrete and mortar tend to break up over time due to the freeze thaw cycles in this cold climate, it makes sense to use a flexible base and joint filler. Until a few years ago, I used either baby sand, which tends to washed out too easily, or rough-graded sand to fill between concrete or clay pavers. I used chips n dust or stone dust or slag sand to fill between natural flagstone. Rough sand and the fillers I used between flagstones worked fairly well for keeping the joints filled and the pavers from shifting. (Of course aluminum or plastic edging is necessary to keep the edges of each project from shifting outward, but that is another subject). The real downside of these joint-filling materials is that they don't keep weeds down. And yes, there is some washout over time.
Then, a few years ago, I started using a fairly new product: polymeric sand. This type of sand can be purchased pre-mixed for small projects, or added to dry sand and thoroughly mixed for larger projects. Polymeric sand creates flexible, porous joints. The polymer binders in the mixture keep the sand particle continuously adhered one another. Though this product is significantly more expensive than straight sand or stone products like those purchased at sand/gravel pits, there are two major benefits. First, polymeric sand remains where it is placed. There is no washout of this product. Second, polymeric sand creates a barrier to burrowing insects that tend to loosen and expel sand from between joints, and weeds that would otherwise germinate and grow between joints. It is most efficient to use polymeric sand between joints when initially installing a brick or stone paving project. However, it is also possible to replace other joint-filling products with polymeric sand if your product is already in place. "Simply" sweep, blow, scrap, or power wash the sand or stone from between the joints of your pavers. Remove the old sand/ stone. If you have used water to clean out the joints, make sure the pavers have dried completely before putting down polymeric sand. Most of these products tend to stain surrounding pavers if they come in contact water. For this reason, it is necessary to sweep or blow off excess sand before moving on to the next step. Once the final paver compaction is completed, finely mist the entire paved area. This will moisten the top layer of the polymeric sand, thus adhering those grains to each other. Subsequent rain or irrigation will filter down into the joints further joining the particles to each other, ensuring proper adhesion. The joints will look like they have been mortared if they are fairly wide. To the touch, they will even feel mortared. However, scraping or otherwise manually agitating the polymeric sand would loosen it without damage. Once wetted again, the sand will settle back into place and adhere as before. No more weeds or washout.

Warning!  Not all polymeric sands are made equal.  Though I have not used all types, I have kept up on professional forum and have found complaints of hazing from Alliance polymeric sand, excessive splashing from Envirobond polymeric sand which is a very fine powder, and blowouts from Techniseal/Unilock polymeric sand.  I will be doing some investigating and comparisons and talking to other professionals and further fill you in on these issues.  Ultimately, you need to closely follow manufacturers recommendations.  Best practices seem to be to ensure proper compaction of pavers when they are dry; sweep sand into joints; sweep off and blow all excess sand from paver surface; mist the pavers lightly to settle the sand; wait an hour; mist again; wait another hour and mist a final time.

Need some help with project or other paving/hardscape project design, installation or maintenance?
Give Brent a Call @ 616 328-3258.

Friday, October 14, 2011

Fall Projects - Lawn Health

Fall is a great time to improve the health of your lawn. Among the various projects that a home owner can do, or hire a professional to do, are dethatching, over-seeding, fertilizing and weed prevention.
Right now, I am going to recommend dethatching, a simple way to improve the health of your lawn. For those of you who mulch your leaves and grass clippings into your lawn, this is an important step in the care of your lawn. Mulching clippings is a great way to insulate your grass from excessive heat and cold as well as drought that can strain the lawn and open it up to disease and insect damage. Insects love to live in that thatch buildup. Even if you don't use a mulching system on your mower, you should take a look at your lawn to see if build up is occurring. Cut out a small plug of sod in several areas of your lawn. Pull them up a look to see if there is more than half an inch of clippings built up above the soil line. If there is, it is probably time to dethatch. However, years of mulching can create buildup of thatch, which keeps water from penetrating easily. Additionally, for those of you who use insecticides and fertilizers, thatch build up can decrease their effectiveness by blocking the pathway to the root zone. When water, that can not drain properly, comes in contact with these chemicals, runoff occurs. Unnecessary runoff. If you have had trouble with ineffective fertilizer and insecticide applications, this may be your problem.
The goal of dethatching is to remove the thatch which prevents proper water and chemical penetration. Dethatching machines can be rented at most equipment rental stores. I just dethatched several acres of lawn for a client in Grand Rapids. The machine cost $90.00 for a 24 hour rental. I completed the dethatching in about six hours. Not your typical yard. Using a rake, gas powered blower, and a zero turn lawn mower, I removed approximately fifteen yards of old thatch from the lawn. That's seven and a half mounded pickup trucks full. It took me twelve hours to accomplish this.
Most of you won't have such a large project on your hands. One to two hours (maybe) using the dethatcher and another hour of raking would probably do the trick. Rent the machine for under $50.00. Operation of the dethatcher is simple. If you can mow, you can dethatch. For those of you who have a tiny yard, or don't want to spend the money, but have the time, inclination, and strength to do it, you can buy a dethatching rake to do this project.
Once you have finished dethatching your lawn, including raking up the clippings and composting or otherwise disposing of the product, you can move on to overseeding, fertilizing and weed control. Tenacity, one of the newest weed control products out there, can be applied at the same time you are overseeding/seeding and still effectively control post- and pre-emergent weeds according to Syngenta. Check it out: http://www.greencastonline.com/TenacityHerbicide/index.aspx. I'll be testing that product claim this fall and next spring to let you know how it works out.

Monday, December 7, 2009

Raised Vegetable Gardens In Caledonia

My newest project has provided me with the opportunity to experiment with varied forms. Check out some pictures of this project in progress.


Once the raised beds were completed, my clients decided they would like to further enhance their yard by adding a paver patio inside the circular walls. By doing so, we increased the usefulness of this area. Now it can be used as a sitting area in addition to the original vegetable garden.


Note the design we used: the "flower petals" face north, south, east, and west. Hard to see in the pictures, but the colors added were made using concrete stain and are green and purple (blue stain over red pavers).


Creta Wall blocks make up this curving, free-standing wall system with built in bench.  Combined with pavers we have created stunning front entry for clients in Caledonia, MI.


 Call Brent if you have been thinking about creating something unique in your landscape.
616 328-3258


Detail-oriented, precision cuts = stunning works of art.
 Installing the proper crushed stone base for any retaining wall system is essential.

Brent Langley installing landscape fabric between the crushed stone fill (used for proper drainage) and the garden soil to be added later. This landscape fabric will keep the soil from seeping into the stone below.


Rubber set between the corregated barn wall and the soil will keep the soil from corroding the siding.


The properly installed crushed stone base for this paver patio ensures this project will last for many decades.


Circular patios, curving walls, and built-in benches in progress.


Wednesday, October 8, 2008

Landscape Design: Harmony


Harmony in the landscape refers to the way in which various elements in the landscape are organized to create a sense of unity or continuity within individual garden areas as well as between areas within the overall landscape. There are many elements that can be used to create harmony within a landscape. Each element adds a different dimension of unity and can be used in combination with the other elements to create an overall sense of harmony within the garden and landscape. Among these harmonizing elements, I would like to emphasis the following: Color Schemes, Repeated Hardscapes elements, Repeated Forms, and Green Spaces. Let’s look at some of these various elements in detail.
Color Schemes are probably the most easily identified harmonizing element in a landscape, and therefore the most habitually emphasized of these elements. Color Schemes usually rely on specific color combinations that can make or break a garden. For this reason color schemes must be chosen with care. However, the most exciting combinations are not always planned. Feel free to experiment with new partnerships. Choose an individual color or several contrasting or complimenting colors to be used throughout the landscape (see the color wheel).
Color partnerships can be separated into two categories: contrasting colors and complimentary colors. When contrasting colors are combined, they tend to draw attention to themselves through explosive relationship. Tension is created, heightening our senses and drawing our eyes to this place. By standing out, these dissonant color combinations further emphasis the more harmonic color combinations. Seizing our attention, these contrasting color combinations can highlight transition between two areas in the landscape. Beware: too many dissonant color combinations can destroy a garden. Our goal should then be to limit these contrasting color combinations in order to emphasis the overall unity of the garden or landscape.
It is easy to focus exclusively on flower color. However, flowers come and go. They blossom and fade with the seasons’ change. Foliage, however, is longer lasting and thus, perhaps, the more important producer of color choices in the landscape. I would, therefore, encourage you to try basing your color scheme on the foliage of one or more specimen plants. You may even consider the color found in other elements such boulders, tree and shrub bark, a garden sculpture or paver brick.
Hardscape elements repeated in the landscape can also draw together a disparate landscape. Thus, when you are dealing with various themes such as formal and informal areas or perennial and annual gardens, Consider using common hardscape elements such as stone or brick. Both of these can be used in a number of applications. For instance, granite can be used to create a very appealing patio or walkway as well as retaining walls. Perhaps you could use granite to create a unique water feature such as a fountain surrounded by granite pebbles.
Repeating a particular plant such as a Rhododendron or weeping Japanese Maple could also add another unifying element.
Try using Redwood or Cedar in both your fencing as well as your decking application. Match the brick in your front walkway to the brick on your house. It may be difficult to match the paving brick exactly, especially if your home is more than a couple of years old. However, there is almost always another brick that will coordinate with the existing house brick

Sunday, October 5, 2008

Sustainable Lawn Care: Stewardship

Sometimes, grass is not the answer. Here in West Michigan, many homes are located on heavily wooded lots. Little sun ever filters down to the ground. This means it is always a struggle in some areas to keep that grass growing. Most lawns need a minimum of three hours of direct sunlight to remain lush and sustainable. If you don't get enough light, there really are only two remedies: prune the trees to allow enough light to get down to the lawn, or forget about your traditional lawn.

It is not always feasible or desirable to prune those shade trees. Get rid of the shade, and you lose


some of the character of the lot you loved so much in the first place. Also, remember, even if you raise the tree canopy, you might have to deal with tree roots. Trees are very thirsty. Lawns that must compete with trees for water and nutrients require extra watering and nutrients to keep them healthy.

If you don't mind getting rid of some of those trees, (they are not always desirable), keep in mind, there tends to be a considerable amount of cost, either in labor or dollars. If you decide you can stand to lose some of those trees and you can afford the expense, make sure you choose a tree service company with the necessary experience to safely remove your trees. Not everyone with a chainsaw is skilled enough to remove trees located near your home or electrical/phone wires around your home.

If you decide, "this lawn is not worth the effort", there are several alternatives to be explored. I will briefly mention them here and expound later.

First, and perhaps most obvious: groundcovers such as Myrtle or Pachysandra. These are very low maintenance plants that can grow densely in both sun and shade. Once they mature, they tend to choke out most weeds, and so keep a very nice carpet like appearance. Downside: you can't really walk through the area anymore. These plants grow six to twelve inches high and make traversing somewhat difficult. Certainly, not desirable on a regular basis.


Second, there are lower growing groundcovers, sometimes called "Steppables". Among these are Irish and Scotch Moss as well as low-growing sedums. These also give a carpet like appearance to your former lawn areas, and allow a bit more access to the area than do Myrtle and Pachysandra. Keep in mind: the "Steppables" have their limits. If you expect significant foot traffic through these areas, stepping stones will be necessary to keep feet off the plants and directed through the area to limit plant disturbance or damage. In addition, not all of these groundcovers can be grown in the shade. Carefully research the various groundcovers before choosing the one for you particular needs. For a fairly exhaustive list of low-growing ground covers go to www.stepables.com


Third, you may want to consider installing mixed gardens. Mixed gardens combine various types of plants, i.e. perennials, shrubs, groundcovers, trees and annuals. Again, if there tends to be significant foot traffic through the areas, install paths to keep those feet off the plants.


Fourth, consider putting in a brick or stone patio. Though a project like this is significantly more expensive and/or time consuming, it does add to the enjoyment of the outdoors by creating a space in which to enjoy your gardens and woodland. In addition, properly installed patios add value to your property that lawns, gardens and groundcovers never can.